Introduction
Infrastructure as Code has revolutionized how we deploy cloud resources. Instead of clicking through AWS console menus for hours, you can define your entire infrastructure in code and deploy it in minutes. In this hands-on tutorial, I’ll walk you through deploying a complete multi-tier architecture on AWS using Terraform—covering everything from IAM user creation to verifying your deployed resources.
What You’ll Build:
- Virtual Private Cloud (VPC) with public and private subnets
- EC2 instances for application servers
- RDS database for data persistence
- Application Load Balancer for traffic distribution
- Complete multi-tier architecture ready for production workloads
Prerequisites:
- Basic understanding of AWS services
- Familiarity with command-line operations
- A virtual machine or local Linux environment
- AWS account access

Part 1: Setting Up IAM User with Terraform Permissions
Before Terraform can create resources on your behalf, it needs proper AWS credentials. We’ll create a dedicated IAM user with administrative access.
Step 1: Connect to Your Virtual Machine
First, SSH into your virtual machine using the provided credentials:
bash
ssh cloud_user@your_vm_ip_address
Replace your_vm_ip_address with your actual VM’s public IP address.

Step 2: Access the AWS Management Console
Open your web browser in an incognito/private window (this prevents credential conflicts if you have multiple AWS accounts) and navigate to the AWS Management Console. Log in with your credentials.
Pro Tip: Using incognito mode is a best practice when working with multiple AWS accounts or lab environments.
Step 3: Navigate to IAM
In the AWS Console search bar, type “IAM” and select Identity and Access Management from the results.
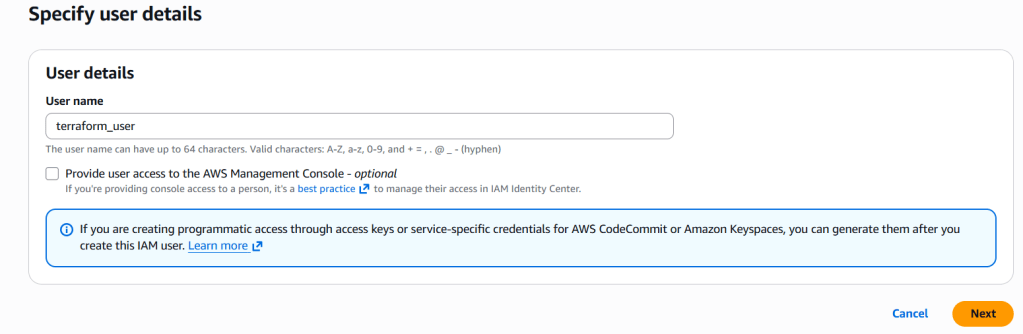
Step 4: Create the Terraform User
- Click on Users in the left sidebar
- Click the Create User button
- Enter
terraform-useras the username - Click Next
Step 5: Assign Administrative Permissions
On the Set permissions page:
- Select Attach policies directly
- Search for
AdministratorAccess - Check the box next to the AdministratorAccess policy
- Click Next
Why AdministratorAccess? For this tutorial, we’re granting full permissions to simplify the deployment. In production environments, you should follow the principle of least privilege and grant only the specific permissions Terraform needs.

Step 6: Complete User Creation
Review your selections and click Create user. You should see a success message confirming the user was created.
Step 7: Generate Access Keys
This is the critical step—creating the credentials Terraform will use:
- Click on your newly created
terraform-user - Navigate to the Security credentials tab
- Scroll down to Access keys and click Create access key
- Select Command Line Interface (CLI) as the use case
- Check the confirmation box and click Next
- Add a description tag (optional) and click Create access key
IMPORTANT: You’ll see your Access Key ID and Secret Access Key. This is the ONLY time you’ll see the secret key!
- Copy both values and store them securely
- Never commit these credentials to Git
- Consider using a password manager
Part 2: Installing Git and Cloning the Terraform Repository
Now that we have AWS credentials, let’s get the Terraform code onto our virtual machine.
Step 1: Update Your System
Back in your VM terminal, update the package index to ensure you have access to the latest packages:
bash
sudo yum update -y
The -y flag automatically answers “yes” to all prompts, streamlining the installation process.
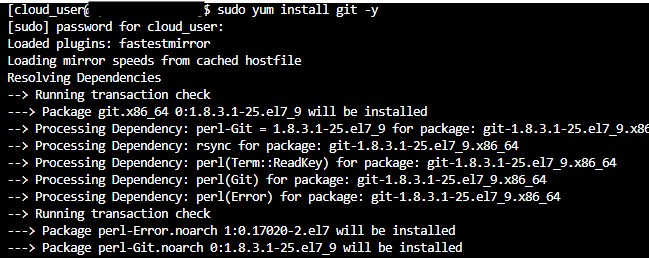
Step 2: Install Git
Install Git to enable repository cloning:
bash
sudo yum install git -y
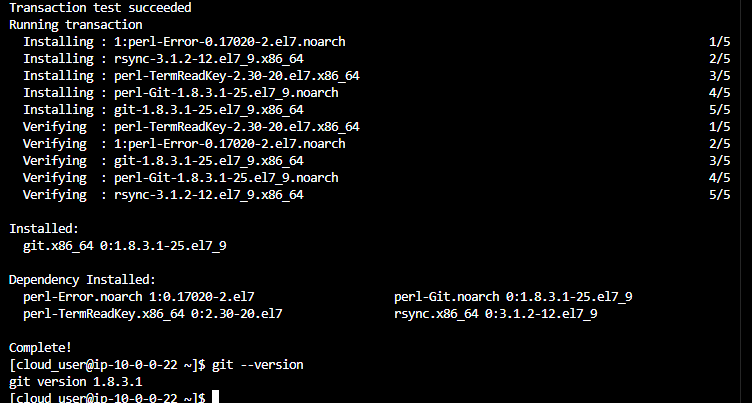
Step 3: Verify Git Installation
Confirm Git is installed correctly:
bash
git --version
You should see output similar to git version 2.x.x.
Step 4: Clone the Terraform Repository
Clone the repository containing the multi-tier architecture code:
bash
git clone https://github.com/Faaeznaf/apex-multi-tier-architechture.git
Step 5: Navigate to the Project Directory
Change into the cloned directory:
bash
cd multi-tier-terraform
You’re now in the project root where all the Terraform configuration files reside.

Part 3: Installing Dependencies and Configuring AWS CLI
The repository includes an installation script that handles all the necessary dependencies. We’ll also need to configure the AWS CLI with our credentials.
Step 1: Make the Installation Script Executable
Before running any script, you need to grant it execute permissions:
bash
chmod +x install.sh
What does chmod +x do? It adds execute (+x) permissions to the file, allowing you to run it as a program.
Step 2: Run the Installation Script
Execute the script to install Terraform and other required tools:
bash
./install.sh
The script will automatically download and install:
- Terraform CLI
- AWS CLI (if not already installed)
- Any other project dependencies
Step 3: Install Git LFS (Large File Storage)
The repository uses Git LFS to manage large binary files efficiently. Install and configure it:
bash
sudo yum install epel-release -y
sudo yum install git-lfs -y
git lfs install
git lfs pull
Why Git LFS? Large files like Terraform provider binaries or module packages are stored separately from the main repository to keep clone times fast. Git LFS downloads these files only when needed.
Step 4: Configure AWS CLI
Now we’ll configure the AWS CLI with the credentials we created earlier:
bash
aws configure
You’ll be prompted for four values:
- AWS Access Key ID: Paste the Access Key ID you saved earlier
- AWS Secret Access Key: Paste the Secret Access Key you saved earlier
- Default region name: Enter
us-east-1 - Default output format: Press Enter (leave blank for default JSON format)

Security Note: These credentials are now stored in ~/.aws/credentials. Be careful not to expose this file or commit it to version control.
Part 4: Deploying Infrastructure with Terraform
This is where the magic happens. Terraform will read your infrastructure code and create all the AWS resources automatically.
Step 1: Initialize Terraform
Initialization prepares your Terraform working directory:
bash
terraform init
What happens during terraform init?
- Downloads required provider plugins (AWS provider in this case)
- Initializes the backend for state storage
- Prepares modules and dependencies
You should see output ending with “Terraform has been successfully initialized!”

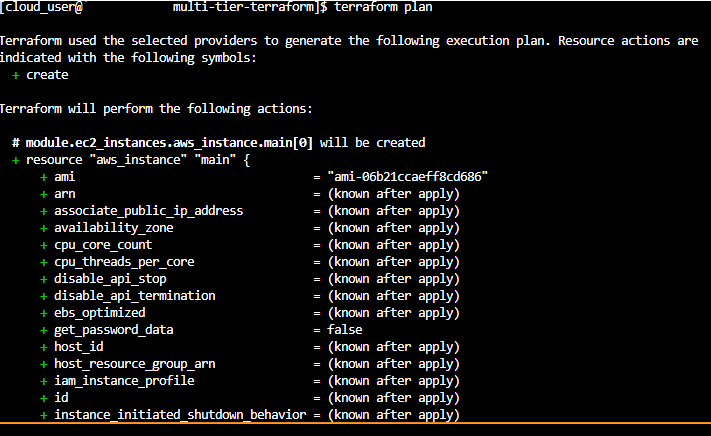
Step 2: Preview the Infrastructure Changes
Before creating any resources, let’s see what Terraform plans to do:
bash
terraform plan
This command performs a “dry run” that shows:
- Resources that will be created (marked with
+) - Resources that will be modified (marked with
~) - Resources that will be destroyed (marked with
-) - Total count of changes
Pro Tip: Always review the terraform plan output carefully before applying changes. This prevents accidental resource deletions or modifications.
Step 3: Apply the Terraform Configuration
Now let’s create the actual infrastructure:
bash
terraform apply
Terraform will display the same plan output and prompt you for confirmation. Type yes to proceed.
What’s being created?
- VPC with CIDR blocks
- Public and private subnets across multiple availability zones
- Internet Gateway and NAT Gateways
- Route tables and associations
- Security groups with ingress/egress rules
- EC2 instances for application tier
- RDS database instance
- Application Load Balancer with target groups
- Auto-scaling configurations (if included)
This process typically takes 5-15 minutes depending on the complexity of your architecture.

Part 5: Verifying Your Deployed Resources
Let’s confirm everything was created correctly by checking the AWS Console.
Step 1: Verify VPC Creation
- In the AWS Console, search for and navigate to VPC
- You should see your newly created VPC with custom CIDR block
- Check the subnets tab to verify public and private subnets were created


Step 2: Verify EC2 Instances
- Navigate to the EC2 service
- Click on Instances in the left sidebar
- You should see your application instances in a “running” state

Step 3: Verify RDS Database
- Search for and navigate to RDS
- Check the Databases section
- Your database instance should be visible with status “Available”

Step 4: Verify Load Balancer
- Navigate back to EC2 service
- Click on Load Balancers under the “Load Balancing” section in the left sidebar
- Your Application Load Balancer should be listed with state “Active”
- Note the DNS name—this is how you’ll access your application

What You’ve Accomplished
Congratulations! You’ve successfully:
- Created a dedicated IAM user with programmatic access
- Configured your local environment with AWS CLI
- Cloned and prepared a Terraform repository
- Deployed a complete multi-tier architecture including:
- Network layer (VPC, subnets, routing)
- Compute layer (EC2 instances)
- Data layer (RDS database)
- Load balancing and traffic management
Key Takeaways
- Infrastructure as Code is Powerful: What would take hours to click through in the console took just one command with Terraform
- Version Control Your Infrastructure: Your entire infrastructure is now defined in code, making it reproducible and version-controlled
- Security Best Practices Matter: Using a dedicated IAM user instead of root credentials is crucial for production environments
- Always Review Before Applying: The
terraform plancommand is your safety net—use it religiously
Next Steps
Consider enhancing this deployment with:
- Terraform State Management: Move state to S3 with DynamoDB locking
- CI/CD Integration: Automate deployments with GitHub Actions or GitLab CI
- Monitoring: Add CloudWatch dashboards and alarms
- Cost Optimization: Implement auto-scaling policies and right-size instances
- Security Hardening: Implement least-privilege IAM policies and enable VPC Flow Logs
Cleanup
Important: To avoid AWS charges, don’t forget to destroy your resources when you’re done:
bash
terraform destroy
Type yes when prompted. Terraform will remove all created resources in the correct order, respecting dependencies.
Full project code: GitHub Repository – Apex Multi-Tier Architecture
Found this helpful? Connect with me on LinkedIn and share your own Terraform deployment experiences!

Leave a comment